Up
CentOS/RedHat 6.5+ Full-Disk Encryption With a USB Key Device
This page is only applicable to CentOS/RHEL 6.5 and later.
Equivalent instructions are available for CentOS/RHEL
5.0 to 5.3
and
5.4 to 5.10.
Introduction
The CentOS default installation now allows one to use
encrypted disks. If you have encrypted devices, you will be prompted
at boot time for your LUKS passphrase.
This is perfect for laptop users, but crypto is sometimes desired in
other situations as well where you might not necessarily want to be
typing in a passphrase.
This page documents a method by which you can place a second LUKS key on
a USB stick to boot your machine.
Note that if an antagonist gets both your USB stick and disk, your data
is compromised.
This mechanism is designed to fail safe: If you don't have
the USB stick, or if the patched files get overwritten
(and not noticed), or if you have to boot from CD/DVD, then you will
be prompted for the original LUKS key, which is a whole lot better than
saying "oops ... too bad".
(In this way, the current mechanism is more robust than the
pre-CentOS-5.4 method.)
Related Resources
I would like to thank
Gary Myers who
provided the dracut-related information on which these instructions are
based.
The
crytpsetup documenation
is an excellent source of material.
Technical Overview
Note that this method has been tested only for
dracut-004-336.el6_5.2.noarch. While it may work for newer
versions of dracut, it will not work for older versions. In particular,
if you have the version of dracut that comes with a stock non-updated
CentOS 6.4 installation, the patch sequence below will
not work. In order to get that one to work, you will need
to patch
/usr/share/dracut/modules.d/50plymouth/cryptroot-ask.sh,
however once you upgrade CentOS that file will no longer exist and your
changes will be lost. Therefore it is best to ensure that your
CentOS 6.x system is completely updated before proceeding.
This procedure assumes that you have already performed a fresh install
of CentOS 6.x where:
/boot is unencrypted. If you are using a single disk,
it may be the first partition /dev/sda1. If you are
using a RAID mirror, then it might be /dev/md0.
- The remaining filesystems (
/, /usr, /var, swap and so forth)
are backed by LVM logical volumes in a single volume group. For our
purposes, we assume that the name of this volume group is
vg1.
- The volume group
vg1 is on a encrypted LUKS device.
If this is so, the pvs command will display the
volume group's device as something like /dev/mapper/luks-*.
If you are using a single disk, this LVM encrypted physical volume
may be backed by a single partition such as /dev/sda2.
If you're using a RAID mirror, it may be backed by /dev/md1.
| Figure 1 |
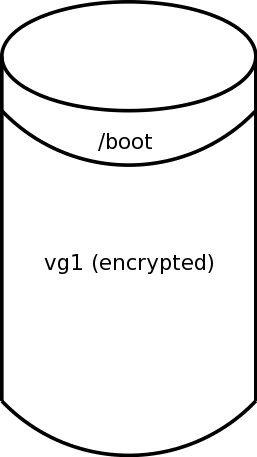 |
- The OS is currently prompting for the LUKS passphrase during boot.
- You will be using a USB device for your LUKS key. The smallest one that
you can find is just fine.
Unlike the 5.x method, this method
will not use a filesystem on the USB device.
(If you have more than one encrypted container,
Gary Myers' reference
gives some information about how they can be handled, but I won't go into
them here.)
The procedure is outlined as follows:
- Preparation
- Initialize the USB Device
- Register the Key
- Patch and Configure
dracut
- Build New Initial Ramdisk
- Test the result
- Monitoring Patched Files
- Troubleshooting
You will be modifying your boot procedure. While this should be benign,
you should be paranoid, especially since your data is already encrypted.
Take some time to be paranoid.
-
Unless you have a virgin system containing no useful information (yet),
back up your system before you start.
-
If you have automated system updates enabled, disable them during
this procedure.
(It is far more common to be notified when updates are available,
but for the system to not install them automatically.
If your system behaves in this manner, you need not disable anything.)
-
Next, you should configure a copy of your existing (working) initrd.
This will allow you, during the testing phase, a boot mechanism should
something go wrong. (You can delete the copy later.)
If you're using the Grub bootloader, then edit your
/etc/grub.conf file. Duplicate one of the entries,
changing the entry title and the name of the initrd image. Make
sure create a copy of the initrd image to match the modified name.
Reboot your system with your backup bootloader configuration to make
sure it works.
You should now set up your USB device that will hold the LUKS key.
This method uses data from your entropy pool. In a base configuration,
a workstation will typically have more entropy available to it than
a server (due to more mouse movement, keystrokes, and other human
interaction), so you may find it better to initialize the USB device
on a workstation and then move it over to your server.
Attach the USB device to your machine. Your dmesg
output and /var/log/messages should show the device
attach, and you should be able to determine the device name.
You should see something like the following:
    SCSI device sdc: 3940479 512-byte hdwr sectors (2018 MB)
    sdc: Write Protect is off
    sdc: Mode Sense: 45 00 00 08
    sdc: assuming drive cache: write through
In this case, the device is /dev/sdc.
Because the sd device names can get dynamically renamed
under some circumstances, you need to be able to identify the USB
device in some other fashion. In CentOS/RHEL 6, the best way to do
this is by using the identifier under /dev/disk/by-id.
Look for it with the following command:
ls -l /dev/disk/by-id | grep usb
/dev/disk/by-id/usb-LaCie_iamaKey_60f2f4441dc104-0:0 -> ../../sdc
sdX name in the previous command matches
what you saw in the previous dmesg output.
Take note of the /dev/disk/by-id/* name; you will use this
later in the configuration step, below.
-
Fill the memory stick with random data via the following command:
dd if=/dev/urandom of=/dev/sdc bs=1
-
[Optional]
If you're feeling really paranoid, you can use the high-grade random
device, /dev/random, to overwrite the portion of the
USB key that you're
actually going to use. Note that in this case, initializing the USB
stick on a workstation where you have mouse and keyboard interactions
is definitely better than doing it on a headless server.
Note also in this case that reading from /dev/random will
in general return partial reads for block sizes greater than 1, so it
is important to use different input and output block sizes. (We keep
the output block size of 512 bytes because of the I/O properties of
the USB key.)
dd if=/dev/random of=/dev/sdc ibs=1 obs=512 count=512
seek value that you may decide to give
to dd.
In this case,
ibs must be 1 to avoid short reads,
obs should be the native block size of your USB device,
and
count should be the number of ibs blocks
(that is, the number of bytes) that are needed for the key, provided
that it is a whole multiple of obs.
Don't go crazy with the number of bits. The command
cryptsetup --help
will tell you the types of ciphers that can be used and their respective
key sizes. Expanding the number of high-quality random bits past the
key sizes (and past the subsequent block size of your USB device) won't
buy you anything; the key will be truncated on use. In the stock
CentOS 6.x install, the key size for "LUKS1" and
"plain" is 256, which means that you only need 256 bits + padding
= 512 bits of high quality random data.
Now that you have a secret key on the USB device, you need to register it
with your boot device. If you generated the secret key on a different
machine such as your workstation, you now have to be back on the server
for which the USB key is destined.
-
Issue the following command to see what LUKS key slots are currently
in use. We assume that your encrypted device is /dev/md1,
so adjust it as appropriate:
cryptsetup luksDump /dev/md1
Key Slot 0: ENABLED and that
all other slots are disabled.
Pick a free key slot. We will assume for this example that you are
using key slot 1.
In the next step we both extract the secret key from your USB device
and write it to a temporary file. We need to do this because
cryptsetup will not accept a binary key on stdin.
In doing this, we don't want to leave the secret key sitting around
after the fact. Although we will attempt to do a secure erasure of
the temporary file, if you write it to a cleartext disk (especially
a cleartext SSD disk), there is no gaurantee that the secure erasure
will work. Therefore pick the location of the temporary file with
some forethought. A location that is on one of your encrypted filesystems
is not a bad idea.
Assuming that the location you picked was /root, extract the key using
the following command:
dd if=/dev/sdc of=/root/luks-secret.key bs=512 count=1
Using the extracted key from the last step, register it with LUKS:
cryptsetup luksAddKey /dev/md1 /root/luks-secret.key --key-slot 1
Delete the temporary file containing your secret from the filesystem:
shred --remove --zero /root/luks-secret.key
You should now see two keys in the LUKS header:
cryptsetup luksDump /dev/md1
There are two patch files that you should download. They are:
Download them to an appropriate spot. For the purposes of this discussion,
I will assume that they are in /tmp.
Next, apply the patches:
    cd /usr/share/dracut/modules.d/90crypt/
    patch -p1 < /tmp/cryptroot-ask.sh.patch
    patch -p1 < /tmp/install.patch
By themselves, the above patches won't have any effect. Before they can do
anything of interest, you must provide a configuration file. Create the file
/etc/usbcrypt.conf, and within it, place these lines:
    #! /bin/sh
    # This file is used as the configuration for unlocking encrypted
    # devices at boot time via a USB key.  It is used by a modified
    # version of /usr/share/dracut/modules.d/90crypt/cryptroot-ask.sh
    # For details, see:
    #   http://www.gno.org/~gdr/sysadmin/centos/6/usb-crypto-key.html
    #

    USBKEY=/dev/disk/by-id/usb-LaCie_iamaKey_60f2f4441dc104-0\:0
    USBKEY_BLOCK_SIZE=512
    USBKEY_BLOCK_COUNT=1
(A sample is also available.)
Ensure that you set the variables in the /etc/usbcrypt.conf
file to be appropriate to your installation; they must correspond to
the way that you extracted the secret key from your USB device in the
instructions, above.
If for any reason you are using the skip option of
dd, the variable USBKEY_BLOCK_SKIP can
also be set. It defaults to zero.
Before you do this step, you've already
configured a backup bootloader entry, right?
After performing all the steps above, you're now ready to create your
new initial ram disk. Assuming you're building it for the currently
running kernel, issue the following command:
/usr/libexec/plymouth/plymouth-update-initrd
Test by rebooting your machine a couple of times:
- First try booting when the USB device is not attached. You
should be prompted
for your passphrase (you can use the LUKS passphrase you used when doing the
initial install; you do not need to memorize what is on the USB device).
- Next try booting with the USB device attached; it should boot without
intervention. If your system reports an invalid file system, it is
probably trying to boot from the USB device instead of hard disk; in this
case, examine your BIOS settings with respect to prioriy of boot devices.
If you have problems, then boot using your backup bootloader entry
and go splunking. If you have problems with the backup bootloader,
you can boot the DVD/CD in rescue mode.
After you're finished testing, don't forget to reenable your automated
updates, if you had previously disabled them.
Of course, the danger to patching system files like this is that occasionally
a system update will come along and clobber your patches. On the bright
side, the boot process is still fail-safe, which means that you will be
prompted for your LUKS passphrase. It is, however, inconvenient. (Otherwise
you wouldn't be looking at the USB stick solution to begin with, would you?)
You can mitigate this problem by downloading the
check-dracut-cryptusb script and
placing it in cron-daily. It will complain bitterly to
root if the patched files are changed (and give instructions about what
should be done about it), so as long as a human is receiving (and reading
and reacting to) root's email, you should be fine.
Note that the first time that this script runs, it will give an innocuous
message about generating a hash file for the patched files.
Gary Myers'
web page on this topic has a few suggestions for troubleshooting, including
how to debug the boot process,
dealing with missing programs in the initrd image,
and dealing with additional encrypted volumes.
|
Contact me @ gdr
at gno.org
|
Up
Last Updated: 26 Apr 2025
|
|